Production-ready comprehensive anti-CSRF/XSS Reactjs client-side authentication using access and refresh tokens

There are multiple ways of doing authentication in React.js Client-Side Rendering AKA CSR applications all over the internet and courses whether on Udemy or Youtube or anywhere else on the internet but most of them are doing it wrong!
Let me tell you why, in those tutorials, they implement the authentication in a way that is totally not secure at all and you will most probably end up in one of the below situations. That is totally fine with them because they are making tutorial videos but if you do those steps in a production application inside a business in a real-world case, you may end up in jail because of helping leak sensitive information unintentionally.
1- Storing access token and auth user data in the localStorage ==> XSS Attack
If you follow this path which is the worst possible way of doing authentication by far, you are going to be vulnerable to a Cross-Site-Scripting AKA XSS attack which means the attacker can inject malicious scripts inside your HTML and steal the localStorage data easily.
Cross-site scripting (XSS) attacks are a type of injection, in which malicious scripts are injected into otherwise benign and trusted websites. XSS attacks occur when an attacker uses a web application to send malicious code, generally in the form of a browser-side script, to a different end-user
2- Storing access token and auth user data in the Cookies ==> CSRF Attack
If you follow the Cookies path, this is a little better but still, you are really vulnerable to a Cross-Site-Request-Forgery AKA CSRF attack meaning that the attacker can hijack your Cookies data and your user sessions.
Cross-Site Request Forgery (CSRF) is an attack that forces an end user to execute unwanted actions on a web application in which they’re currently authenticated. With a little help of social engineering (such as sending a link via email or chat), an attacker may trick the users of a web application into executing actions of the attacker’s choosing.
If the victim is a normal user, a successful CSRF attack can force the user to perform state-changing requests like transferring funds, changing their email address, and so forth. If the victim is an administrative account, CSRF can compromise the entire web application.
What is the solution here?
Well, last year I published an article about 401 errors and how to implement a proper access token and refresh token authentication architecture for our Front-End React.js application you can read it here:
How to do secure Client-Side React apps with protected routes using Apps’ memory!?

I list the guidelines we need to follow and implement to take advantage of the above architecture and also tweak it to make it more secure maybe for financial applications or highly sensitive apps.
1- Back-end server requirements
A Backend server provides access and refresh-token flow on the authentication architecture.
2- Front-End requirements
A Front-End application with store capabilities like React + Context or Redux or any other client-side state management library that can preserve memory as long as the app instance is available.
3- Storage guidelines and notes
We will never store our access token in the browser storage APIs like localStorage, Cookies, sessionStorage, etc, on the other hand, we will store our access token only in the memory context of our application instance which we are using.
4- Cookies Configuration
Our server must be able to send and set the refresh token along with the login response with httpOnly: true, secure: true, sameSite: none flags when we log in to the application and set the sameSite to Strict if your Back-End base URL is identical to your domain address.
*Important update 13 Sep 2023:
Regardless of the Domain attribute of a cookie, two sites are considered the same when their eTLD+1 (aka registrable domain) are the same. See here for more details.
Use the
SameSite=strictflag whenever possible to prevent CSRF. This can only be used if the Authorization Server has the same site as your front-end. If this is not the case, your Authorization Server must set CORS headers in the back-end or use other methods to ensure that the refresh token request can only be done by authorized websites.
httpOnly: true, secure: true, sameSite: strict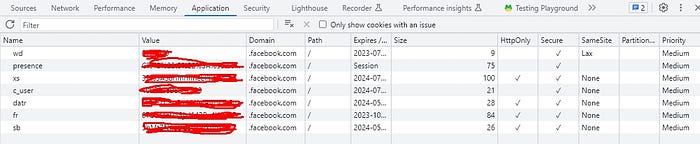
For more information and in-depth knowledge about the Cookies click here.
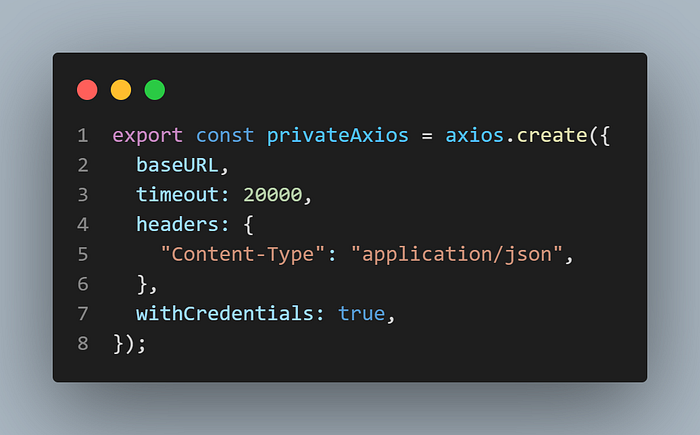
5- Axios or Fetch API configuration
Our Front-End application must add withCredentials: true if it is using Axios and withCredentials: include if it is using fetch API in every request that is made to our private routes and login route to the Back-End server.
The below picture is an example of Axios configurations.
Note: If you have faced a CORS error with the above guideline, you need to add these headers to your server responses:
Access-Control-Allow-Credentials: true;
Access-Control-Allow-Origin: * or your whitelist domains
Access-Control-Allow-Headers: Content-Type,Content-Length, Authorization, Accept,X-Requested-With
Access-Control-Allow-Methods: PUT,POST,GET,DELETE,OPTIONS
You can dig deeper into the above headers here.
6- Access and Refresh token expiration times
If you have done the above steps by now if you log into your app, you will have having access token stored in your app memory context, and the refresh token is set on the headers of every request to your Back-End server so now let’s talk about the tokens expiration times.
The below is just a suggested token expiration time and you can tweak them as you wish in your own favor.
For high-sensitive applications like financial or similar apps:
The Token time => 30 sec, 1 min, 5 min
The Refresh Token time=> 10 min, 20 min, 30 min
For sensitive applications like dashboards or private panels:
The Token time => 15 min, 30 min
the Refresh Token time => 1d, 2d, 3d
For normal applications or social media
the Token time => 1h, 6h, 12h, 24h
the Refresh Token time => 5d, 7d, 15d, 30d, 3mo

You can also add a very handy feature to improve UX for your users, add trust this device check mark in order to ask your users whether they like to stay logged in on the current device that they have been using for a long time or if it is just a temporary session and they want to close it as soon as they leave the browser tab, this is good for the times when your users are accessing your application from a public device and you can tweak your refresh token time by adding such feature and enhance user experience and also make it more secure on your login flow.
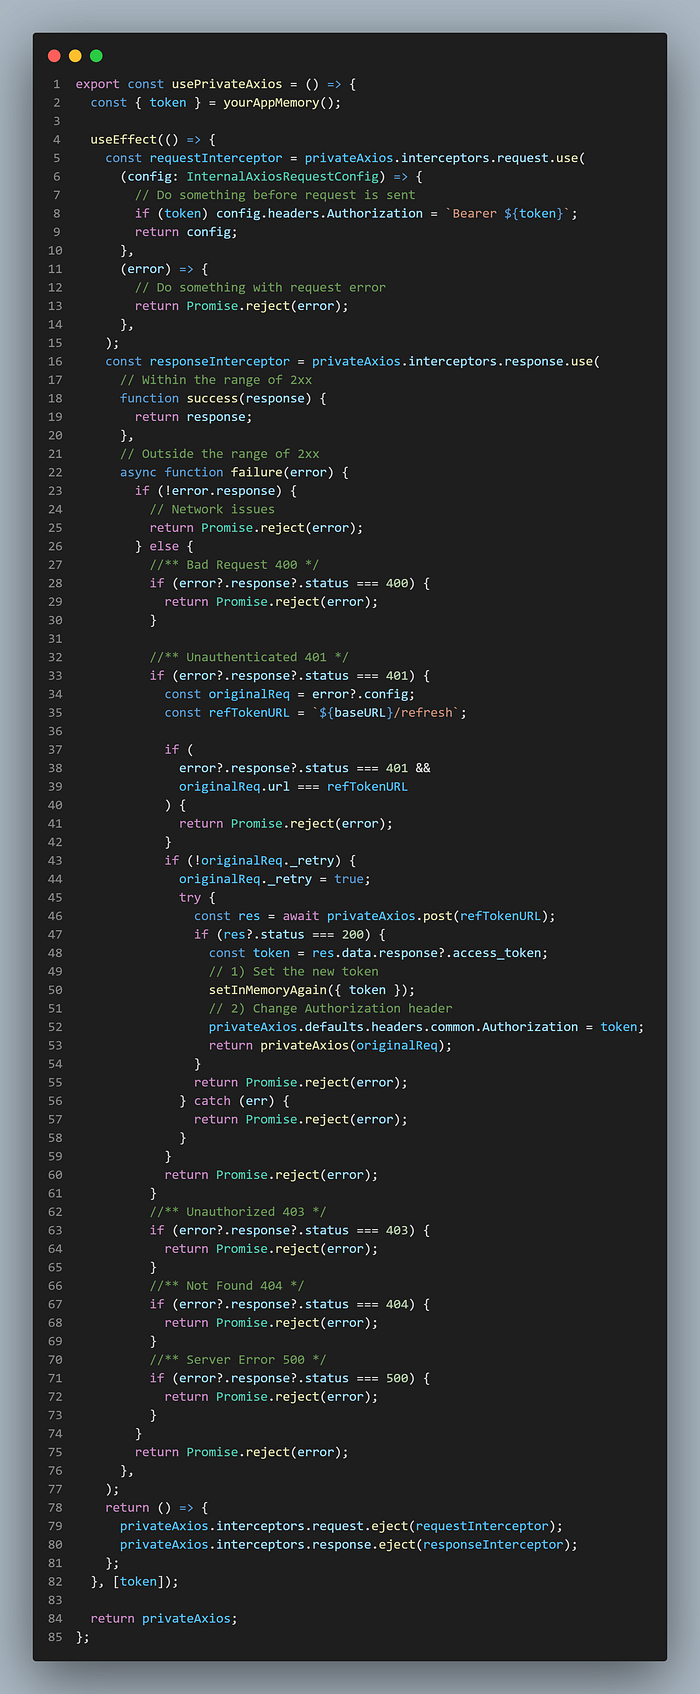
7- Private Axios or Fetch API manager
Intercept all private route requests and responses to check if the access token is expired and then use the refresh token to gain a new access token and replace the previous authorization header with the new access token.
To achieve the above goal, you can create a custom hook called usePirvateAxios in order to add those interceptors to each request you make to your Back-End server and if one of them gets a 401 response then you automatically request to refresh the token route and change the expired access token with a new one and the user is persisted inside the application without noticing this.
export const usePrivateAxios = () => {
  const { token } = yourAppMemory();

  useEffect(() => {
    const requestInterceptor = privateAxios.interceptors.request.use(
      (config: InternalAxiosRequestConfig) => {
        // Do something before request is sent
        if (token) config.headers.Authorization = `Bearer ${token}`;
        return config;
      },
      (error) => {
        // Do something with request error
        return Promise.reject(error);
      },
    );
    const responseInterceptor = privateAxios.interceptors.response.use(
      // Within the range of 2xx
      function success(response) {
        return response;
      },
      // Outside the range of 2xx
      async function failure(error) {
        if (!error.response) {
          // Network issues
          return Promise.reject(error);
        } else {
          //** Bad Request 400 */
          if (error?.response?.status === 400) {
            return Promise.reject(error);
          }

          //** Unauthenticated 401 */
          if (error?.response?.status === 401) {
            const originalReq = error?.config;
            const refTokenURL = `${baseURL}/refresh`;

            if (
              error?.response?.status === 401 &&
              originalReq.url === refTokenURL
            ) {
              return Promise.reject(error);
            }
            if (!originalReq._retry) {
              originalReq._retry = true;
              try {
                const res = await privateAxios.post(refTokenURL);
                if (res?.status === 200) {
                  const token = res.data.response?.access_token;
                  // 1) Set the new token
                  setInMemoryAgain({ token });
                  // 2) Change Authorization header
                  privateAxios.defaults.headers.common.Authorization = token;
                  return privateAxios(originalReq);
                }
                return Promise.reject(error);
              } catch (err) {
                return Promise.reject(error);
              }
            }
            return Promise.reject(error);
          }
          //** Unauthorized 403 */
          if (error?.response?.status === 403) {
            return Promise.reject(error);
          }
          //** Not Found 404 */
          if (error?.response?.status === 404) {
            return Promise.reject(error);
          }
          //** Server Error 500 */
          if (error?.response?.status === 500) {
            return Promise.reject(error);
          }
        }
        return Promise.reject(error);
      },
    );
    return () => {
      privateAxios.interceptors.request.eject(requestInterceptor);
      privateAxios.interceptors.response.eject(responseInterceptor);
    };
  }, [token]);

  return privateAxios;
};
8- Persist on memory instance loss!
You should sometimes consider your users to refresh the application using the browser or open a new tab, close the tab, and re-open it a while later, and behaviors like those that result in complete JavaScript memory loss and Garbage Collection, you must write your app in a way that your users don’t feel it painful to use it when they get kicked out every time they behave like the above!
In that case, you can add a useEffect or React Query to your top-level Auth component to check if the token is not available in memory, it needs to request to refresh-token route to get a new token for the user if it is possible.
9- Authenticated user data
The last piece of the puzzle here is to manage the auth user data, this is totally optional and up to you to follow the proper steps, you may want to encrypt user data coming from the login part using AES and SHA-256 hash and put it on a secure: true, sameSite: Strict Cookie and check the validation of data by decryption each time or you can put those data in the refresh token flow to receive them as well in that response or you can make another request after refresh token to your server to get the auth user data and preserve it in the memory, all of them are fine since no one now can steal your tokens.
Remember to check the auth user data and token validation each time your app memory is re-instantiated like hard-refresh, new tab, etc to make sure if the user is not unauthenticated, you redirect them to the login page.
I hope this article could be helpful to you, please feel free to comment and ask questions.